How I use Anki to study programming: Anki setup and card creation
Anki is a software to use flashcards (question and answer cards) on the computer or mobile. I use it to review what I learn when I am studying programming. Anki is an extremely valuable tool to prevent forgetting what I have studied in the past.
Thanks to using Anki daily for a long time, I can recall many concepts of javascript and other technologies even if I don't use them in my daily work, and even if I have never used them.
Anki reviews are a great way to avoid feeling lost among so many new things to remember while studying programming.
Anki is particularly useful to effectively digest the fundamentals of programming, when one gets started on this field.
I will explain how I setup Anki and how I create cards.
If you don't know what Anki is, you can get an overview here.
Download Anki
Head to AnkiWeb and download the software.
Most likely, you will want to create the cards in your computer and study them in your mobile.
So, download and install both the desktop version and the mobile app for whatever operative systems you use. Once you have installed the app, create an account. That will allow you to synchronize your cards and decks across devices.
Once you have an account, you'll do some initial setup.
Initial setup
We're going to setup Anki for the first time. You only need to do this once.
Create a new deck
You will be adding cards to something called a "deck". The first time you open Anki, you won't have any deck, so you'll have to create one.
Simply click on Create deck, and give it a name. Done. Easy, right?
Customize deck options
Optional, but highly recommended.
The default Anki settings might be "optimal" to memorize things, but have two fairly big disadvantages, in my opinion:
The review rate for cards is high. This means that you review a given card quite often.
The number of reviews per session is high. In a given (daily) session you will be reviewing lots of cards.
This makes the daily review session quite long. In between 20 and 40 minutes, or more. Honestly, I'm too lazy to spend that much time reviewing cards.
So, I tweaked the settings so that review sessions are shorter. About 10 to 20 minutes long.
To customize the deck options:
Click on the small gear icon next to the deck
Select
OptionsAt the top, next to options group, click on
Manageand thenAddName the new options group whatever you like ("quick review", for example)
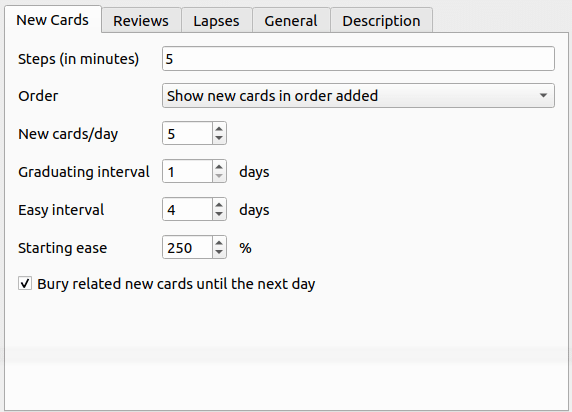
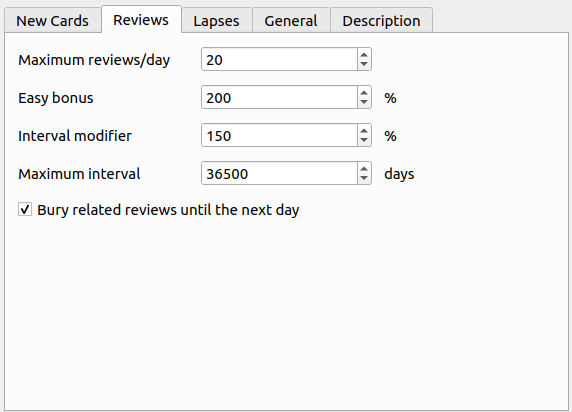
Use the following options:


These settings will give you effective review sessions which are not too long.
Create the cards
Your setup is ready. But your deck has no cards. Kinda useless.
But we're going to fix that.
If you know that you can import decks created by other people, you may be thinking: I'll import someone else's deck.
You could indeed do that, but I discourage it. Creating your own cards will help you study and force you to summarize what you are learning. And the cards will "make more sense" to you.
In short: create your own cards.
I concede that creating the cards can be a bit tedious sometimes, but it pays off. Consider it part of studying.
You can create cards in the app itself, using the add button. However, this is not how I do it most of the time, I prefer another method that for me is faster and more practical.
Let's jump into it.
How do I add cards to Anki easily?
Let's imagine you're studying array methods from the website javascript.info, and you see the following piece of information.
- arr.push(...items) – adds items to the end of an arrayAnd you want to create an Anki card to remember this arr.push() method (don't worry if you have no idea what this is, it's just an example).
Now, open a text editor. Any will do. I use Sublime. You can use the same, or textedit, or notepad or whatever.
In the editor, you will write something like this:
Method that adds items to the end of an array"arr.push(...items)"js

Now you will say: What on earth is this, Luis!?
This will be the content of one Anki card. There are 3 fields, the front of the card, the back of the card, and the tags. In that order.
Front:
Method that adds items to the end of an arrayBack:
arr.push(...items)Tags:
js
To indicate where the front ends and where the back starts, you need a separator, which could be any character. I use one double quote. I could use something else, but a double quote works just fine for me in 99% of the cases.
So, while you study, you will keep on adding cards in that same format, based on the things that you want to remember.
You might end up with something like this (you could have many more lines, the number doesn't matter):
Method that adds items to the end of an array"arr.push(...items)"js

Method that extracts an item from the end"arr.pop()"js

const element = _____Hello, world!_____ // Component renders a h1 heading"const element = <h1>Hello, world!</h1>"react

<a _____>Website</a> // Links to https://example.com"<a href="https://example.com">Website</a>"htmlNote: You do NOT need to add these cards to your Anki deck! This is just a random example!
I want to point out three things here, that you may notice if you look at the previous example:
A new line, or line break indicates a new card
I use empty gaps like
_____very often in the front of the card. It's a simple way to indicate that there's something there that I am supposed to remember.If you look at the last "card" (line), there's something wrong in there. As I mentioned we're using the double quote " as a field separator. However, in the last card, the answer itself contains double quotes. If we try to add that card like that, Anki will get confused and won't be able to tell what are the front, back and tags. We cannot use the separator character inside the fields themselves. The correct version of the last card would look like the following:
<a _____>Website</a> // Links to https://example.com"<a href='https://example.com'>Website</a>"htmlNotice that I replaced the double quotes inside the back field by single quotes.
Import the cards in the text file to Anki
To add these as cards to Anki, we need to import the text file we have created.
Go to the Anki app, click on file, then import.... Then select the text file.
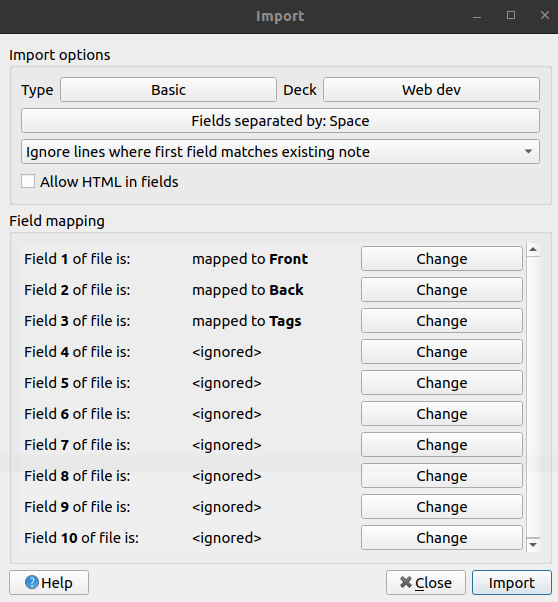
You will see something like this:

You will have to select the right deck where to import the cards. As for the card type, you should choose Basic.
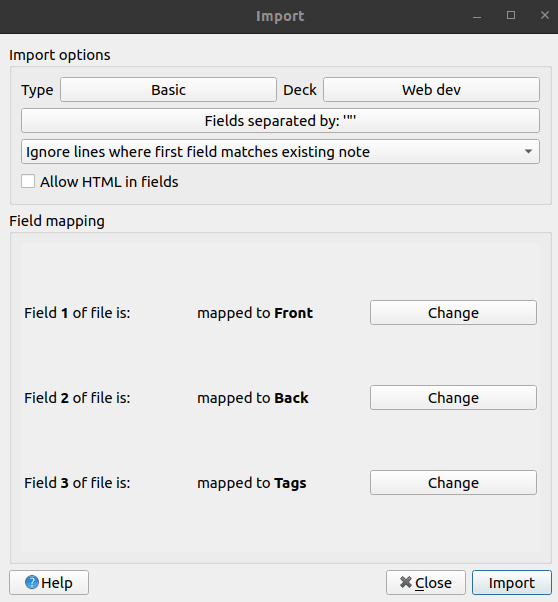
Click on Fields separated by: Space, and here write a double quote. You probably figured out that this should be the separator we used in the text file.
If you didn't use a double quote as separator, then enter whatever you used.

When you click ok, Anki will automatically identify the 3 fields.

Once you click on Import, you are done.
Congratulations! You've just added cards to the deck and you can begin studying.
Using Anki to learn programming is no secret. I got inspiration from others that were doing it long before me. Derek Sivers and Jack Kinsella are two examples.
I used to review the cards while stretching my legs by taking a walk around my neighborhood.
If you skip a day it is not a big deal, but try to review your deck daily. You should notice positive effects almost immediately. After a few weeks of study in combination with daily Anki you will be surprised of how much you're capable of recalling.
You will almost feel like you had a superpower.
As they say in Japan, Ganbatte! (do your best)